Music Reading Basics
Wesley Campbell
If you’re new to the trumpet, chances are, you’re also new to reading music. This article will get you started on how to read music, breaking it down into the two major components: notes and rhythms. If you already know how to read music, congratulations, you can skip this one (go practice!).
Notes
Trumpet music resides (with very few exceptions) on the treble clef. In music theory this is sometimes called a G clef, referring to the loop of the symbol wrapping on the line for G. Similarly, the bass clef is called an F clef, with dots surround the line for F, and the alto clef is called a C clef, with a sort of arrow forming on the line for C. Fortunately, we only need to worry about the treble clef. Each of these clefs, though, follows a similar setup of lines and spaces where the note can be placed. Knowing what lines and spaces mean will tell you the names of each note you encounter.

The lines on the treble clef, going from bottom to top, represent E-G-B-D-F. Most introductory music books use a mnemonic device to learn this (though I also recall simply drilling the letters in order over and over again in elementary school music class). The mnemonic I learned early on was “Every Good Boy Does Fine.” I generally like this one mostly because “fine” rhymes with “line,” so you know which thing you’re trying to remember. The spaces in the treble clef, again from bottom to top, are F-A-C-E. This one is easier to remember because it spells an actual word: face. “Face” which rhymes with “space.” Fine, line. Face, space. Easy, right? If in doubt, remembering even one line or space on the clef should be enough to figure out a note. This is because notes in music, moving upward, go alphabetically from A-G and then repeat. Assuming you know your ABCs, you’re all set.


But what about those notes outside the clef? Yes, most of our notes will be in the staff, but when we play high or low enough, we run out of room. The solution: ledger lines. Every other note moving outward from the clef gets a line through it as if the clef were continuing on. So, ledger lines above the staff, moving upward, are A-C-E-G and so forth (don’t worry, you’ll mostly only need the first two), and ledger lines below the staff, moving downward, are C-A-F (there are technically notes we can play below that (pedal tones), but that’s a whole different beast). Again, if you just go through the alphabet (A-G), figuring out the notes will become easy.
In addition to the, let’s call them “regular” notes, there are also notes referred to as accidentals. These are notes called sharps and flats, indicated by a proceeding symbol. The flat symbol (♭) lowers a written pitch by one half step. The note name would also get the word “flat” added to the end. So, an A with a ♭ in front of it is an A-flat. Following so far? Well, on the flip side of flats, are sharps. When the sharp symbol (♯) is written, the pitch goes up by one half step. So an A with a ♯ in front of it is an A-sharp (for various reasons, though, A-sharp is more commonly seen written as B-flat).

Applying what you just learned to the fingerings you learned in Changing Notes, we finally get to use… a fingering chart!
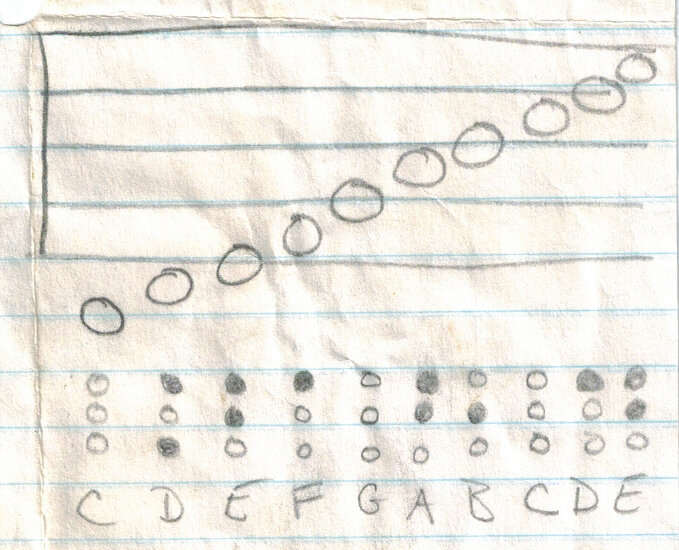
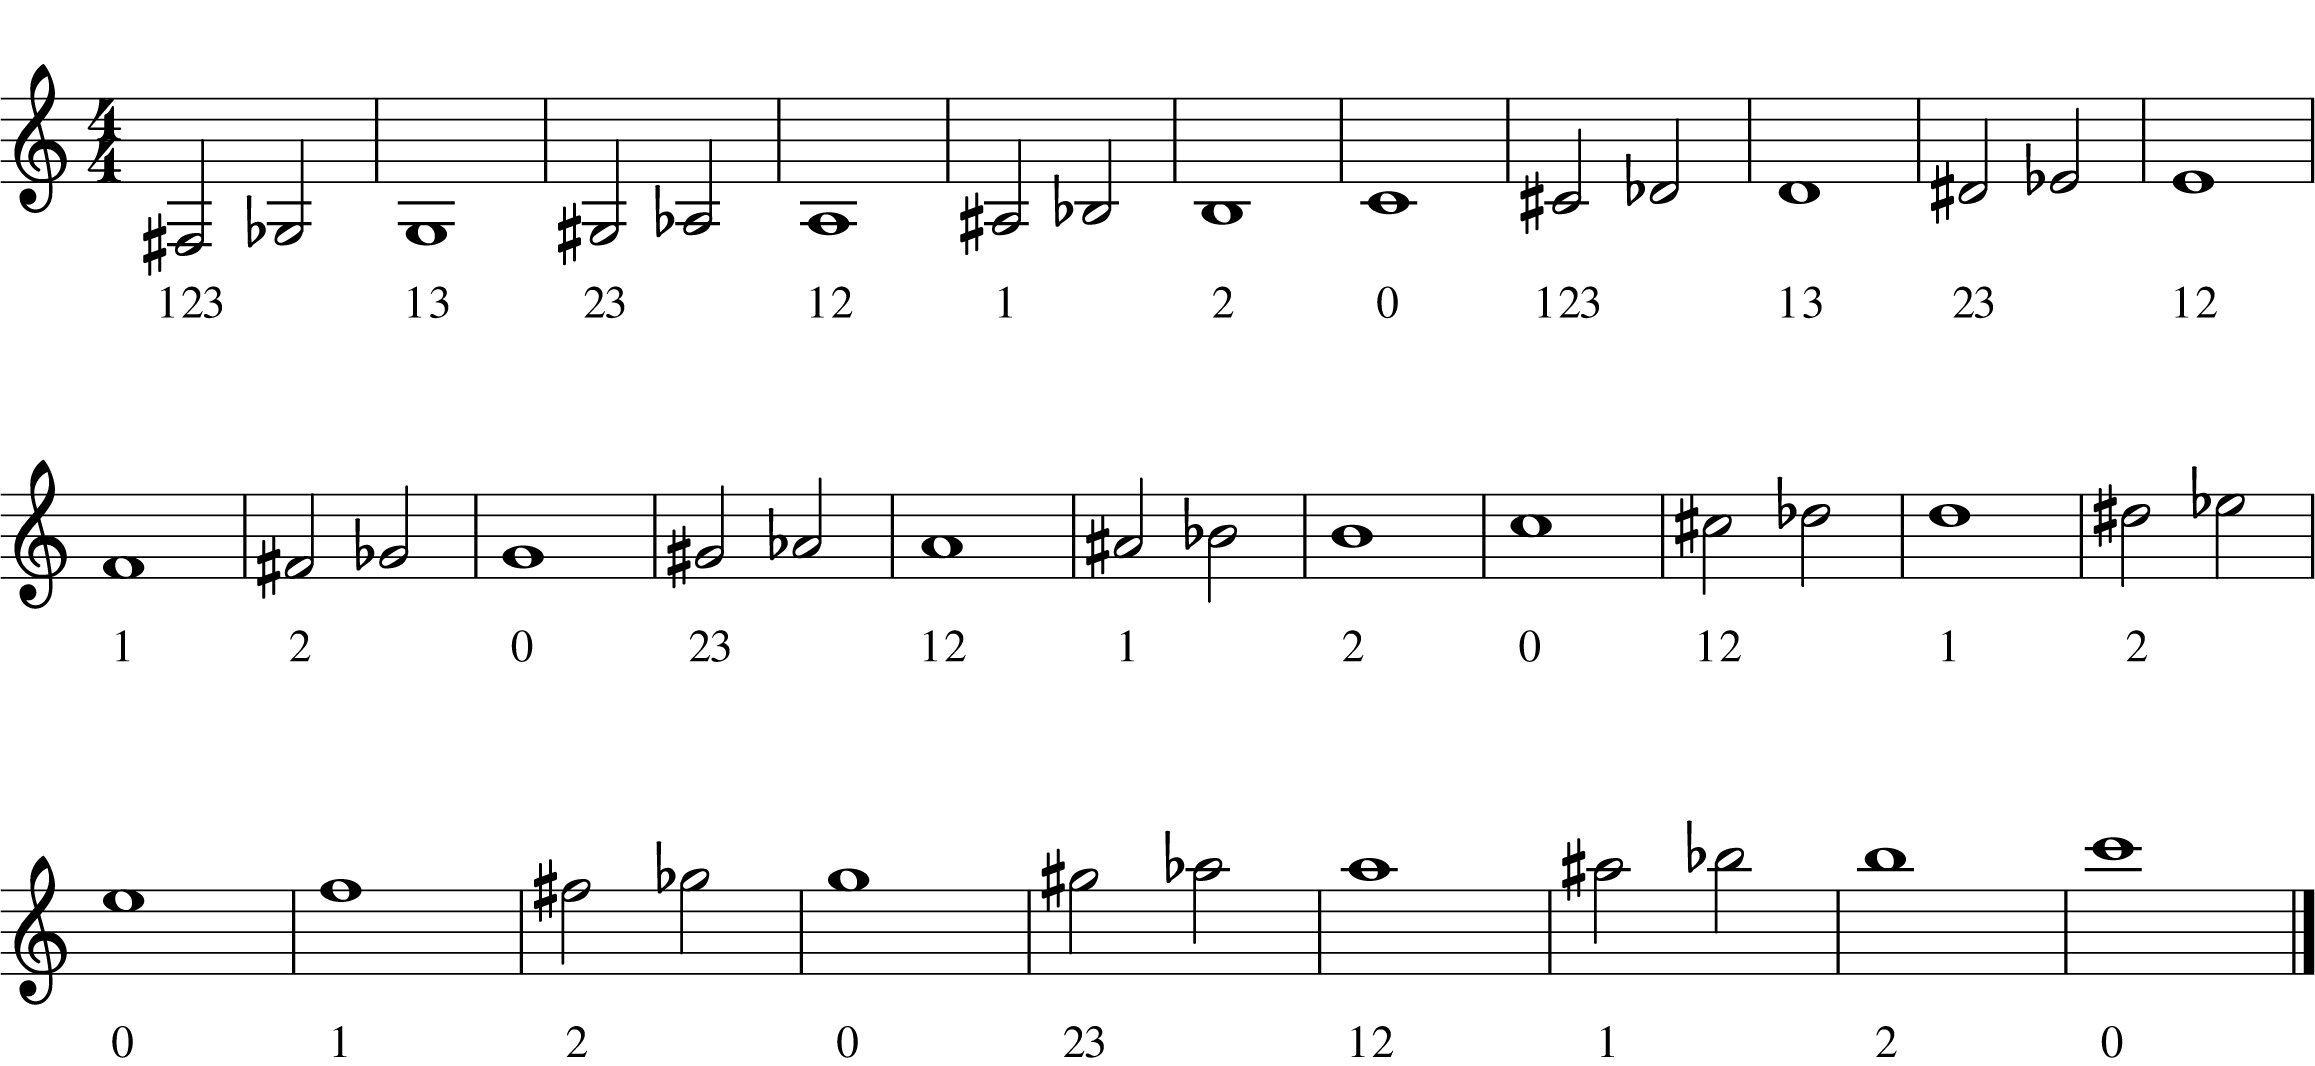
The first fingering chart you see is actually the very first fingering chart I ever had. My dad wrote it out for me the day we came home with my first trumpet (in the summer of 1996!). The style here shows the fingerings pictographically, with shaded valves pressed down, and the valves going 1, 2, 3 from the top down. The second fingering chart uses numbers to represent the fingerings instead of the shaded circles and covers what is often called the “full range” of the trumpet. We can definitely go beyond these notes (in BOTH directions), but don’t worry about that yet… Identifying the fingerings as numbers can be quite useful if you ever find need to write a quick (and hopefully occasional) reminder in your music to help you play the right note.
Rhythm
Now for the other part of music reading. Rhythm. If there’s one thing more important in music than notes, it’s rhythm. Don’t get me wrong here. Notes are super important. Let’s try a thought experiment, though, so you can see what I mean. Think of a song you really like. Now, think about that song with all the right notes, but a completely different rhythm (probably hard to do). On the flip side of that, imagine the song with all the right rhythms, but a completely different set of notes (this is particularly easy to imagine if you’ve ever heard a large group sing “Happy Birthday”). In most cases, getting the correct rhythm is going to result in a song being more recognizable versus just having the notes. You definitely want to have both, but if you don’t have the rhythm, it just won’t sound right.
That having been said, let’s look at how rhythm is written. To begin, we have to look at the time signature. This will be the foundation of our rhythm reading. The time signature indicates both how many beats are in the measure (the top number) and what type of note determines a beat (the bottom number). As the most common time signature is 4/4 (in fact, it’s also called “common time”), that’s where we’ll start. So, 4 beats to a measure is easy, and a quarter note (like the fraction 1/4) gets one beat.

Starting on the left, we have a whole note, which simply looks like an oval. The whole note gets 4 beats and is named for taking up a whole measure in 4/4 time (like I said, the most common time signature). In the following measure you’ll see the corresponding whole rest, which also takes up a whole measure (and looks like the profile of a hole in the ground: whole, hole), but this time a whole measure of silence. The next measure has the half note, which gets a stem added to the oval. It’s no surprise that the half note is half the length of the whole note, getting 2 beats. To fill the measure, we get its partner, the half rest (which kind of looks like a top hat: half, hat). After that, we get the quarter note and quarter rest (which looks like a squiggly backward 3). The quarter note and rest are, you guessed it, a quarter of the length of a whole note, so each gets 1 beat and takes 4 to fill the measure. To distinguish itself from the half note, the quarter note (and each note type after it) gets the oval filled in. You may have noticed by now that each new note is half the length of the one before it. Good catch. That pattern continues on for each new note length. Naturally, then the next measure contains the aptly named eighth note and eighth rest (looks like a fancy 7 to me), which gets an eighth of the length of the whole note: one half of a beat. You’ll notice that the eighth note looks like a quarter note with a flag to distinguish it. When an eighth note is placed individually, that flag falls toward the oval. When two or more eighth notes are placed consecutively, the flags combine into a beam, grouping them together. Each new note and rest after the eighth will follow this addition by gaining an additional flag or beam as you’ll see in our last measure with the sixteenth note and sixteenth rest. As a trumpet player, you will certainly at some point see sixteenth notes, and maybe down the road even thirty-second notes. There are even more (I’ve, unfortunately, had to play and count 128th notes on occasion), but it’s easy enough to figure out how long the notes are by simply dividing in half for each new flag.
This is by no means all there is to reading notes or rhythm. There are entire books and courses devoted to music reading. Hopefully, though, this will be enough to get you started on you journey. Now go find some music and try to play it On Your Own!